에이젝스?
80. Spring WebMVC 활용하기

*Spring WebMVC 아키텍처

프론트컨트롤러 (DispatcherServlet) // 서블릿으로 만들어짐
앞에서 모든 요청도 주고 응답도함.
return 전 , 6 JSP 를 include 함 (JSP가 view 임)
return 응답
페이지 컨트롤러(Controller) // 일반 자바객체
call: 실제 일을 함 , 요청을 처리 (1. 요청할 때 넘어온 데이터 가공, 2. 가공한 데이터로 서비스 객체 실행,3. 서비스 객체가 뱉어낸 결과(응답 데이터를 가공 4. 어느 뷰 컨포넌트를 사용할지 지정하고, 뷰컨포넌트를 알려줌)
return : view 컴포넌트 정보 / ex JSP URL
서비스 객체 // 일반 자바객체
비지니스 로직 수행 (컨트롤러가 넘겨준 데이터를 가지고 )
트랜젝션 제어
DAO 객체 // 일반 자바객체
데이터 처리
*서비스객체 & DAO 객체 : Model 이라고 부름
MVC 종류
1. standalone - GUI App
- pc 설치형
2. Web App
*Page Controller
@Controller : 페이지 컨트롤러 임을 표시

*DispatcherServlet <<servlet>>

<?xml version="1.0" encoding="UTF-8"?>
<web-app xmlns="http://xmlns.jcp.org/xml/ns/javaee"
  xmlns:xsi="http://www.w3.org/2001/XMLSchema-instance"
  xsi:schemaLocation="http://xmlns.jcp.org/xml/ns/javaee
                      http://xmlns.jcp.org/xml/ns/javaee/web-app_4_0.xsd"
  version="4.0" metadata-complete="false">

  <description>
    스프링 Web MVC 프레임워크 예제 테스트
  </description>

  <display-name>java-spring-webmvc</display-name>

  <!-- Spring Web MVC의 프론트 컨트롤러 역할을 수행할 서블릿을 지정한다. -->

  <!-- DispatcherServlet 배치하기 : 방법1-->

  <!-- => DispatcherServlet은 자체적으로 IoC 컨테이너(기본: XmlWebApplicationContext)를 보유하고 있다.
       => 파라미터를 사용하여 IoC 컨테이너의 설정 파일을 지정해야 한다.
          초기화 파라미터명: contextConfigLocation
          초기화 파라미터값: 예) /WEB-INF/app-servlet.xml
       => 설정하고 싶지 않다면 init-value를 비워둬라.
  -->
  <servlet>
    <servlet-name>app</servlet-name>
    <servlet-class>org.springframework.web.servlet.DispatcherServlet</servlet-class>
    <init-param>
      <param-name>contextConfigLocation</param-name>
      <param-value>/WEB-INF/app-servlet.xml</param-value>
    </init-param>
    <!-- 서블릿을 요청하지 않아도 웹 애플리케이션을 시작시킬 때 자동 생성되어
         IoC 컨테이너를 준비할 수 있도록
         다음 옵션을 붙인다. -->
    <load-on-startup>1</load-on-startup>
  </servlet>
  <servlet-mapping>
    <servlet-name>app</servlet-name>
    <url-pattern>/app/*</url-pattern>
  </servlet-mapping>

  <welcome-file-list>
    <welcome-file>index.html</welcome-file>
    <welcome-file>index.htm</welcome-file>
    <welcome-file>default.htm</welcome-file>
  </welcome-file-list>

</web-app>
=> web.xml에서 ㄷ디스패처 안에 잇는 ioc 컨테이너의 위치를 설정하지 않으면 자동으로 /WEB-INF 밑에서 디스패처서블릿이름으로 설정된 *servlet.xml 을 찾는다


| // 프론트 컨트롤러(DispatcherServlet)가 실행할 페이지 컨트롤러는 // 다음과 같이 @Controller 애노테이션을 붙여야 한다. @Controller public class HelloController { |
| // 클라이언트 요청이 들어왔을 때 호출될 메서드(request handler)를 // 표시하려면 다음과 같이 @RequestMapping 애노테이션을 붙여야 한다. // @RequestMapping(요청URL) // => 예) // @RequestMapping(value="/hello") // @RequestMapping("/hello") // @RequestMapping(path="/hello") @RequestMapping({"/hello", "/hello2", "/okok"}) |
| // 리턴하는 String 값이 뷰 컴포넌트(예: JSP)의 URL이 아닌 경우 // 애노테이션으로 표시한다. // => @ResponseBody : 리턴하는 문자열이 클라이언트에게 보낼 콘텐트임을 표시한다. // => 이 애노테이션이 붙어 있으면, // 프론트 컨트롤러는 리턴 값을 클라이언트에게 그대로 전송한다. @ResponseBody public String hello() throws Exception { return " |
* ContextLoaderListener // ServletContextListener임:
ServletContextListener : 서버(웹앱)가 실행될 때 실행되는 객체 = contextinitialaized 실행됨. , contextdestroyed는 웹앱이 종료될때 실행됨.


* 여러개의 DispatcherServlet


* DispatcherServlet의 기본 IoC 컨테이너 교체하기
기본 IoC 컨테이너: xmlWebApplicationContext 내장되어 있음

addServlet: 서블릿 등록
Dynamic: 부가 정보 설정

startup의 기능
이 객체를 만들어서 startup을 호출할때
톰캣이 4. 스프링이니셜라이져 객체를 만들어서 찾은다음에 온스타트업에 넣어서 호출.


// 페이지 컨트롤러 만드는 방법@Controller // 이 애노테이션을 붙인다.
@RequestMapping("/c01_1") // 컨트롤러에 URL을 매핑한다.
public class Controller01_1 {
//@RequestMapping // 이 애노테이션을 붙여서 요청이 들어왔을 때 호출될 메서드임을 표시한다.
@ResponseBody // 메서드의 리턴 값이 클라이언트에게 출력할 내용임을 표시한다.
public String handler() {
return "c01_1 -> handler()";
}
// URL 한 개 당 한 개의 핸들러만 연결할 수 있다.
// 같은 URL에 대해 다른 메서드를 또 정의하면 실행 오류가 발생한다.
@RequestMapping <===== 요거 붙은게 적용됨
@ResponseBody
public String handler2() {
return "c01_1 -> handler2()";
}
}=> 클래스에 매핑 붙이고 메서드에 매핑붙이면 됨.
// 페이지 컨트롤러 만드는 방법 - 기본 URL과 상세 URL을 분리하여 설정하기
package bitcamp.app1;

import org.springframework.stereotype.Controller;
import org.springframework.web.bind.annotation.RequestMapping;
import org.springframework.web.bind.annotation.ResponseBody;

@Controller
@RequestMapping("/c01_3") // 핸들러에 적용될 기본 URL을 지정한다.
public class Controller01_3 {

  @RequestMapping("h1") // 기본 URL에 뒤에 붙는 상세 URL. 예) /c01_3/h1
  @ResponseBody
  public String handler() {
    return "h1";
  }

  @RequestMapping("/h2") // 앞에 /를 붙여도 되고 생략해도 된다. 예) /c01_3/h2
  @ResponseBody
  public String handler2() {
    return "h2";
  }

  @RequestMapping("h3")
  @ResponseBody
  public String handler3() {
    return "h3";
  }

  @RequestMapping("h4")
  @ResponseBody
  public String handler4() {
    return "h4";
  }

  @RequestMapping({"h5", "h6", "h7"})
  @ResponseBody
  public String handler5() {
    return "h5,h6,h7";
  }
}
// GET, POST 구분하기
package bitcamp.app1;

import org.springframework.stereotype.Controller;
import org.springframework.web.bind.annotation.RequestMapping;
import org.springframework.web.bind.annotation.RequestMethod;
import org.springframework.web.bind.annotation.ResponseBody;

@Controller
@RequestMapping("/c02_1")
public class Controller02_1 {

  // 테스트 방법:
  // => http://localhost:9999/eomcs-spring-webmvc/html/app1/c02_1.html

  @RequestMapping(method = RequestMethod.GET) // GET 요청일 때만 호출된다.
  @ResponseBody
  public String handler1() {
    return "get";
  }

  @RequestMapping(method = RequestMethod.POST) // POST 요청일 때만 호출된다.
  @ResponseBody
  public String handler2() {
    return "post";
  }
}
// GET, POST 구분하기 II
package bitcamp.app1;
import org.springframework.stereotype.Controller;
import org.springframework.web.bind.annotation.GetMapping;
import org.springframework.web.bind.annotation.PostMapping;
import org.springframework.web.bind.annotation.RequestMapping;
import org.springframework.web.bind.annotation.ResponseBody;
@Controller
@RequestMapping("/c02_2")
public class Controller02_2 {
// 테스트 방법:
// => http://localhost:9999/eomcs-spring-webmvc/html/app1/c02_2.html
@GetMapping // GET 요청일 때만 호출된다.
@ResponseBody
public String handler1() {
return "get";
}
@PostMapping // POST 요청일 때만 호출된다.
@ResponseBody
public String handler2() {
return "post";
}
}// request handler를 구분하는 방법 - 파라미터 이름으로 구분하기
package bitcamp.app1;
import org.springframework.stereotype.Controller;
import org.springframework.web.bind.annotation.GetMapping;
import org.springframework.web.bind.annotation.RequestMapping;
import org.springframework.web.bind.annotation.ResponseBody;
@Controller
@RequestMapping("/c03_1")
public class Controller03_1 {
// 테스트 방법:
// => http://localhost:9999/eomcs-spring-webmvc/app1/c03_1?name=kim
@GetMapping(params = "name")
@ResponseBody
public String handler1() {
return "handler1";
}
// 테스트 방법:
// => http://localhost:9999/eomcs-spring-webmvc/app1/c03_1?age=20
@GetMapping(params = "age")
@ResponseBody
public String handler2() {
return "handler2";
}
// 테스트 방법:
// => http://localhost:9999/eomcs-spring-webmvc/app1/c03_1?name=kim&age=20
@GetMapping(params = {"age", "name"})
@ResponseBody
public String handler3() {
return "handler3";
}
// 테스트 방법:
// => http://localhost:9999/eomcs-spring-webmvc/app1/c03_1
@GetMapping
@ResponseBody
public String handler4() {
return "handler4";
}
}
// request handler를 구분하는 방법 - Accept 요청 헤더의 값에 따라 구분하기
package bitcamp.app1;

import org.springframework.stereotype.Controller;
import org.springframework.web.bind.annotation.GetMapping;
import org.springframework.web.bind.annotation.RequestMapping;
import org.springframework.web.bind.annotation.ResponseBody;

@Controller
@RequestMapping("/c03_3")
public class Controller03_3 {

  // 테스트 방법:
  // => http://localhost:9999/eomcs-spring-webmvc/html/app1/c03_3.html
  // => 요청 헤더 중에서 Accept의 값에 따라 구분할 때 사용한다.
  //
  // Accept 헤더?
  // => HTTP 클라이언트(웹 브라우저)에서 서버에 요청할 때
  //    받고자 하는 콘텐트의 타입을 알려준다.

  @GetMapping(produces = "text/plain")
  @ResponseBody
  public String handler1() {
    return "handler1";
  }

  @GetMapping(produces = "text/html")
  @ResponseBody
  public String handler2() {
    return "handler2";
  }

  @GetMapping(produces = "application/json")
  @ResponseBody
  public String handler3() {
    return "handler3";
  }

  @GetMapping
  @ResponseBody
  public String handler4() {
    return "handler4";
  }
}

// request handler를 구분하는 방법 - Content-Type 헤더의 값에 따라 구분하기
package bitcamp.app1;

import org.springframework.stereotype.Controller;
import org.springframework.web.bind.annotation.PostMapping;
import org.springframework.web.bind.annotation.RequestMapping;
import org.springframework.web.bind.annotation.ResponseBody;

@Controller
@RequestMapping("/c03_4")
public class Controller03_4 {

  // Content-Type 요청 헤더
  // => HTTP 클라이언트가 보내는 데이터의 콘텐트 타입이다.
  // => 프론트 컨트롤러는 보내는 데이터의 타입에 따라 처리를 구분할 수 있다.

  // 테스트 방법:
  // => http://localhost:9999/eomcs-spring-webmvc/html/app1/c03_4.html
  // => 클라이언트가 POST 요청으로 데이터를 보낼 때 기본 형식은 다음과 같다.
  //      application/x-www-form-urlencoded
  // => <form> 태그에서 enctype 속성에 "mulpart/form-data"를 지정하면
  //    해당 형식으로 서버에 값을 보낸다.
  // => 자바스크립트를 사용하여 개발자가 임의의 형식으로 값을 보낼 수 있다.
  //
  // 클라이언트가 POST로 요청할 때 보내는 데이터의 유형에 따라 호출될 메서드를 구분할 때 사용한다.

  // 다음 메서드는 application/x-www-form-urlencoded 형식의 데이터를 소비한다.
  // => 즉 클라이언트의 HTTP 요청에서 Content-Type 헤더의 값이 위와 같을 때
  //    이 메서드를 호출하라는 의미다.
  @PostMapping(consumes = "application/x-www-form-urlencoded")
  @ResponseBody
  public String handler1() {
    return "handler1";
  }

  // 다음 메서드는 multipart/form-data 형식의 데이터를 소비한다.
  @PostMapping(consumes = "multipart/form-data")
  @ResponseBody
  public String handler2() {
    return "handler2";
  }

  // 다음 메서드는 text/csv 형식의 데이터를 소비한다.
  @PostMapping(consumes = "text/csv")
  @ResponseBody
  public String handler3() {
    return "handler3";
  }

  // 다음 메서드는 application/json 형식의 데이터를 소비한다.
  @PostMapping(consumes = "application/json")
  @ResponseBody
  public String handler4() {
    return "handler4";
  }

  // 다음 메서드는 Content-Type 헤더가 없을 때 호출된다.
  @RequestMapping
  @ResponseBody
  public String handler5() {
    return "handler5";
  }
}


// 요청 핸들러의 아규먼트 - @RequestParam@Controller
@RequestMapping("/c04_2")
public class Controller04_2 {
// 클라이언트가 보낸 파라미터 값을 바로 받을 수 있다.
// => 요청 핸들러의 파라미터로 선언하면 된다.
// 단 파라미터 앞에 @RequestParam 애노테이션을 붙인다.
// 그리고 클라이언트가 보낸 파라미터 이름을 지정한다.
// 테스트:
// => http://localhost:9999/eomcs-spring-webmvc/app1/c04_2/h1?name=kim
@GetMapping("h1")
@ResponseBody
public void handler1(
PrintWriter out,
ServletRequest request,
@RequestParam(value = "name") String name1,
@RequestParam(name = "name") String name2, // value와 name은 같은 일을 한다.
@RequestParam("name") String name3, // value 이름을 생략할 수 있다.
/* @RequestParam("name") */ String name // 요청 파라미터 이름과 메서드 파라미터(아규먼트)의 이름이 같다면
// 애노테이션을 생략해도 된다.
) {
out.printf("name=%s\n", request.getParameter("name"));
out.printf("name=%s\n", name1);
out.printf("name=%s\n", name2);
out.printf("name=%s\n", name3);
out.printf("name=%s\n", name);
}
// 테스트:
// http://.../app1/c04_2/h2?name1=kim&name2=park
@GetMapping("h2")
@ResponseBody
public void handler2(
    PrintWriter out,

    @RequestParam("name1") String name1, // 애노테이션을 붙이면 필수 항목으로 간주한다.
    // 따라서 파라미터 값이 없으면 예외가 발생한다.

    String name2, // 애노테이션을 붙이지 않으면 선택 항목으로 간주한다.
    // 따라서 파라미터 값이 없으면 null을 받는다.

    @RequestParam(value = "name3", required = false) String name3,
    // required 프로퍼티를 false로 설정하면 선택 항목으로 간주한다.

    @RequestParam(value = "name4", defaultValue = "ohora") String name4
    // 기본 값을 지정하면 파라미터 값이 없어도 된다.
    ) {

  out.printf("name1=%s\n", name1);
  out.printf("name2=%s\n", name2);
  out.printf("name3=%s\n", name3);
  out.printf("name4=%s\n", name4);
}
// 요청 핸들러의 아규먼트 - 도메인 객체(값 객체; Value Object)로 요청 파라미터 값 받기// 요청 핸들러의 아규먼트 - 도메인 객체(값 객체; Value Object)로 요청 파라미터 값 받기
package bitcamp.app1;
import java.io.PrintWriter;
import org.springframework.stereotype.Controller;
import org.springframework.web.bind.annotation.GetMapping;
import org.springframework.web.bind.annotation.RequestMapping;
import org.springframework.web.bind.annotation.RequestParam;
import org.springframework.web.bind.annotation.ResponseBody;
@Controller
@RequestMapping("/c04_3")
public class Controller04_3 {
// 클라이언트가 보낸 요청 파라미터 값을 값 객체에 받을 수 있다.
// => 요청 핸들러의 아규먼트가 값 객체라면,
// 프론트 컨트롤러는 메서드를 호출할 때 값 객체의 인스턴스를 생성한 후
// 요청 파라미터와 일치하는 프로퍼티에 대해 값을 저장한다.
// 그리고 호출할 때 넘겨준다.
//
// 테스트:
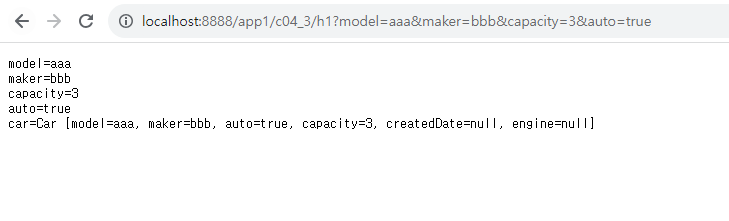
// => http://.../c04_3/h1?model=sonata&maker=hyundai&capacity=5&auto=true&engine.model=ok&engine.cc=1980&engine.valve=16
@GetMapping("h1")
@ResponseBody
public void handler1(
PrintWriter out,
String model,
String maker,
/*@RequestParam(defaultValue = "100")*/ int capacity, // 프론트 컨트롤러가 String 값을 int로 변환해 준다.
// 단 변환할 수 없을 경우 예외가 발생한다.
boolean auto,
// 프론트 컨트롤러가 String 값을 boolean으로 변환해 준다.
// 단 변환할 수 없을 경우 예외가 발생한다.
// "true", "false"는 대소문자 구분없이 true, false로 변환해 준다.
// 1 ==> true, 0 ==> false 로 변환해 준다. 그 외 숫자는 예외 발생!
Car car
// 아규먼트가 값 객체이면 요청 파라미터 중에서 값 객체의 프로퍼티 이름과 일치하는
// 항목에 대해 값을 넣어준다.
// 값 객체 안에 또 값 객체가 있을 때는 OGNL 방식으로 요청 파라미터 값을
// 지정하면 된다.
// 예) ...&engine.model=ok&engine.cc=1980&engine.valve=16
) {
out.printf("model=%s\n", model);
out.printf("maker=%s\n", maker);
out.printf("capacity=%s\n", capacity);
out.printf("auto=%s\n", auto);
out.printf("car=%s\n", car);
}
}

객체안에 객체에 값을 넣고 싶을 때
car, engine 이면 ,,
engine.model="ㅁㅁㅁ"이렇게 파라미터 넣으면 됨
'[네이버클라우드] 클라우드 기반의 개발자 과정 7기 > 웹프로그래밍' 카테고리의 다른 글
| [NC7기-94일차(9월8일)] - 웹프로그래밍 75일차 (0) | 2023.09.08 |
|---|---|
| 9/7 프로젝트 (0) | 2023.09.07 |
| [NC7기-92일차(9월6일)] - 웹프로그래밍 73일차 (0) | 2023.09.06 |
| 9/6 프로젝트 (0) | 2023.09.06 |
| [NC7기-91일차(9월5일)] - 웹프로그래밍 72일차 (0) | 2023.09.05 |