// 스프링 IoC 컨테이너 사용
#Spring IoC Container
Inversion of Control 제어의 역전 - 남이 만든 객체를 주입 받는 것
IoC Container = Bean Container
(자바객체)
Bean Container 에 담겨 있는 것
1. Dependency Injection : 의존성 주입
의존객체 = 사용할 객체 주입
2. Event Listener
call 하는 게 아니라 call 당함 = call back (cb)
=> IoC Container 는 DI의 응용이고, DI Container 임
#ApplicationContext 인터페이스 ( = IoC 컨테이너 사용법)
=> 스프링 IoC 컨테이너의 사용 규칙을 정의한 인터페이스이다.
=> 모든 스프링 IoC 컨테이너는 이 규칙에 따라 정의되어 있다.
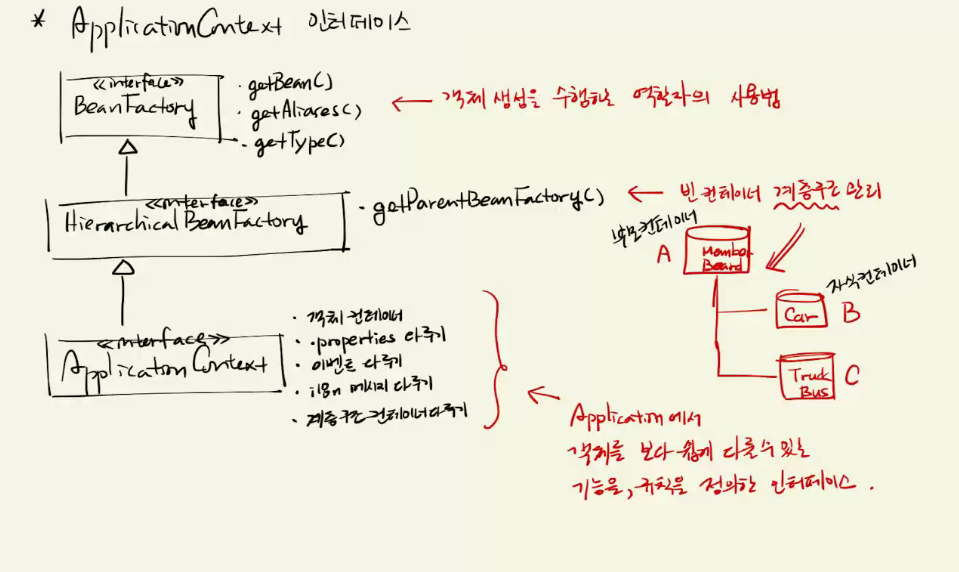
BeanFactory <<interface>>
객체를 add 시키는 기능은 없음
--
ApplicationContext 구현체
new라는 명령으로 객체 만들 수 있는 클래스: concreate

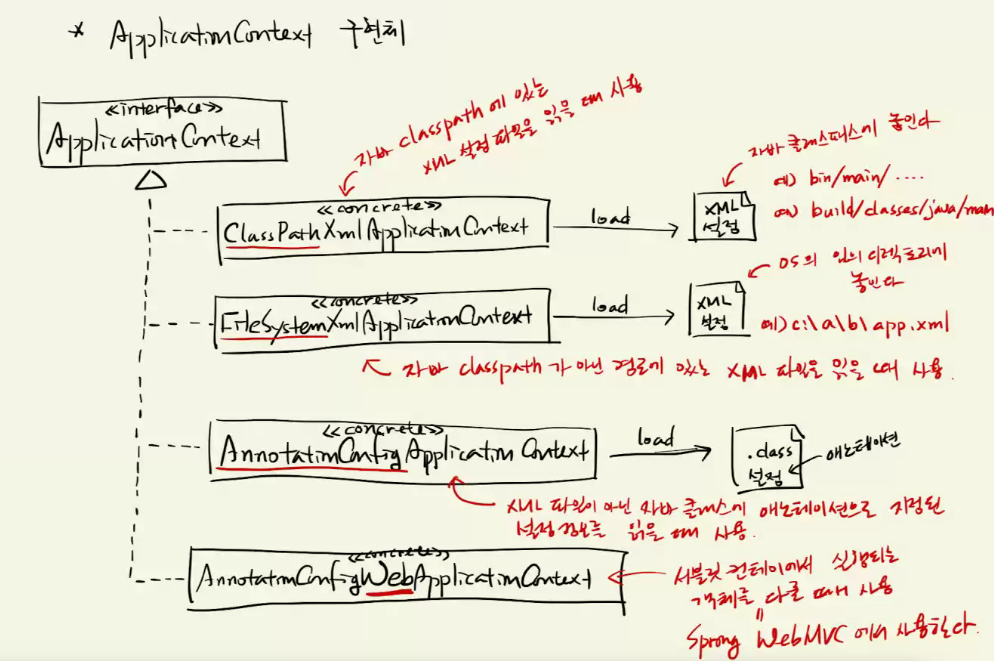
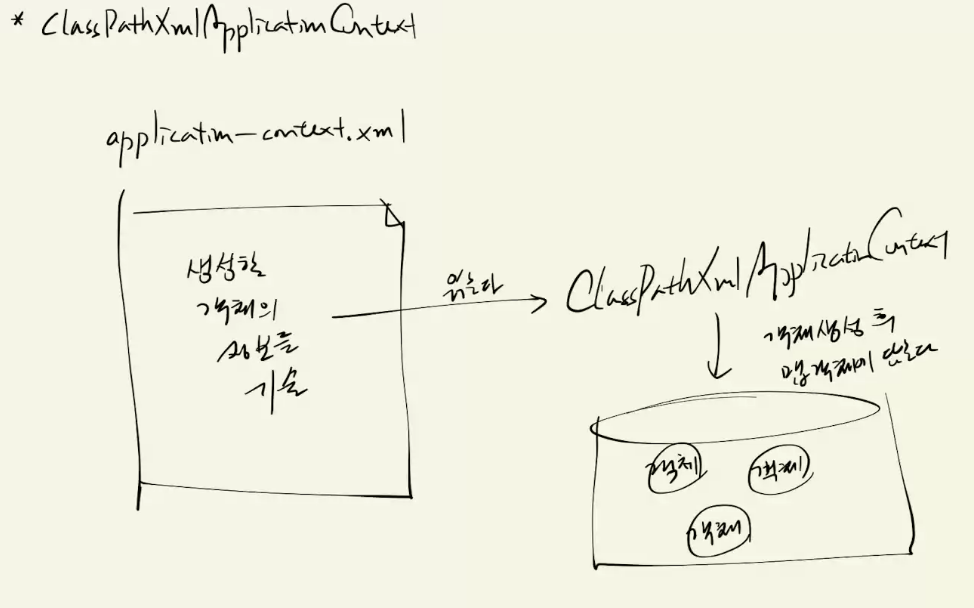
#ClassPathXmlApplicationContext
규칙:

1) 자바 CLASSPATH 에서 설정 파일을 찾는 IoC 컨테이너
// => 자바 CLASSPATH?
// 1) JVM을 실행할 때 -classpath 옵션으로 지정한 경로
// 예) $java -class c:\a\b;d:\xxx\yyy\zzz;c:\bb\x.jar Hello
// 2) 만약 -classpath 경로가 지정되어 있지 않으면,
// OS에서 CLASSPATH 환경 변수로 등록한 경로
//
// => 파일 경로이기 때문에 패키지와 패키지 사이에는 . 대신에 /를 사용해야 한다.
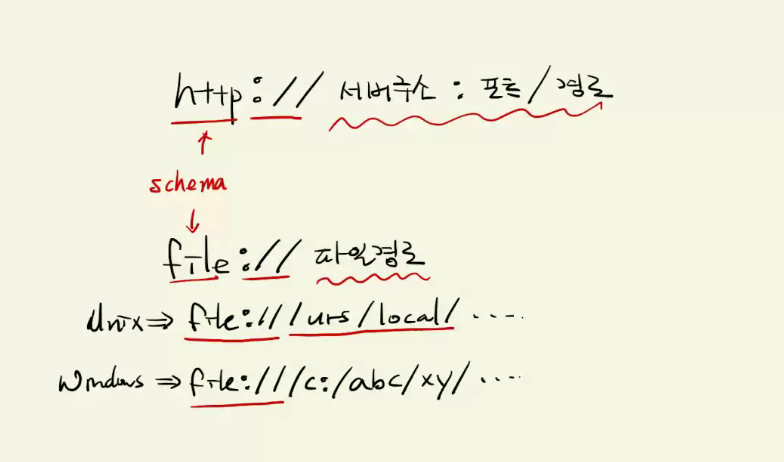
// 2) 운영체제의 파일 시스템에서 설정 파일을 찾는 IoC 컨테이너
// => 자바 classpath가 아닌 다른 폴더에 설정파일이 있을 경우 사용한다.
// => 설정 파일 경로를 지정할 때 파일 시스템 경로를 지정해야 한다.
// => 단, URL 형식으로 지정해야 한다.
// => 예) file://설정파일경로
// => URL 형식에서는 파일 시스템을 가리킬 때 접두어 'file://'를 붙인다.

public static void main(String[] args) {
// 3) 자바 클래스 파일의 애노테이션으로부터 설정 정보를 추출한다.
// => 자바 클래스로 설정 정보를 다루는 것을 'Java Config' 라 부른다.
// => 생성자 파라미터로 Java Config 클래스의 타입 정보를 넘긴다.
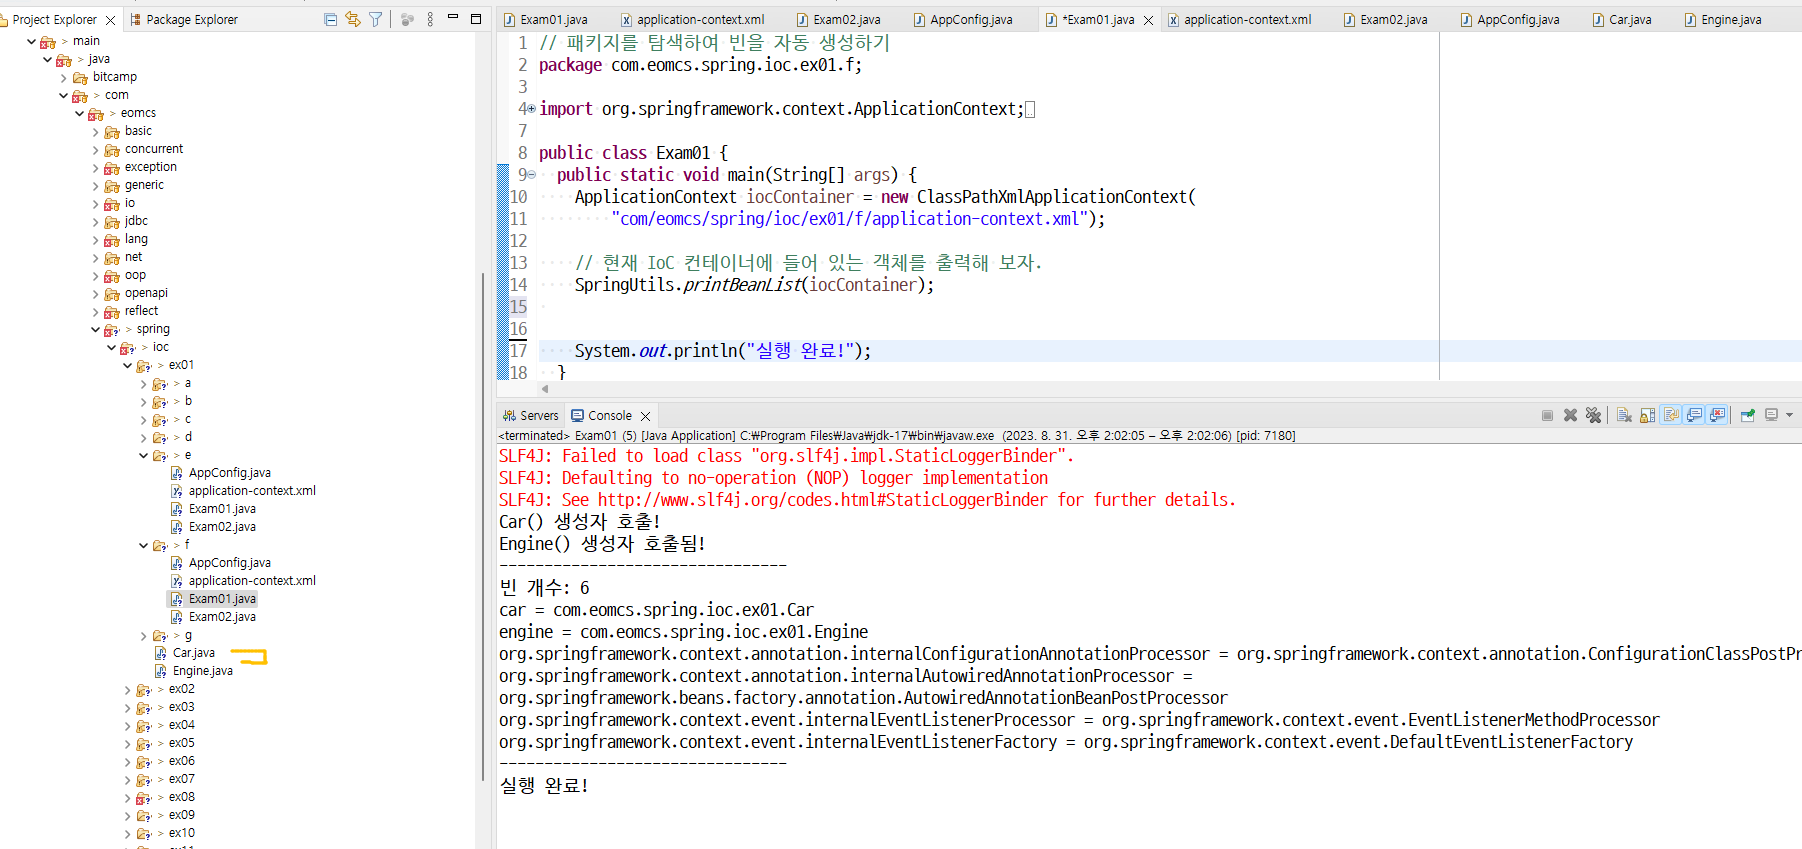
ApplicationContext iocContainer = new AnnotationConfigApplicationContext(
AppConfig.class);
--
ClassPathXmlApplicationContext은 객체를 만들라고 설정 따로 안 하면 아무것도 안 생김
AnnotationConfigApplicationContext은 자동으로 생기는게 잇음 아래 5개(버전마다 다름)
총 5개 생김

org.springframework.context.annotation.internalConfigurationAnnotationProcessor = org.springframework.context.annotation.ConfigurationClassPostProcessor
설정정보를 읽어들이고
org.springframework.context.annotation.internalAutowiredAnnotationProcessor = org.springframework.beans.factory.annotation.AutowiredAnnotationBeanPostProcessor
의존객체 주입
org.springframework.context.event.internalEventListenerProcessor = org.springframework.context.event.EventListenerMethodProcessor

org.springframework.context.event.internalEventListenerFactory = org.springframework.context.event.DefaultEventListenerFactory


위4개: 애노테이션 처리에 필요한도우미 객체
appConfig = com.eomcs.spring.ioc.ex01.d.AppConfig  // 그 클래스의 객체.
// IoC 컨테이너에 객체를 보관하기 //컨테이너가 만들어야할 객체를 설정하는 방법
|
ClassPathXmlApplicationContext
|
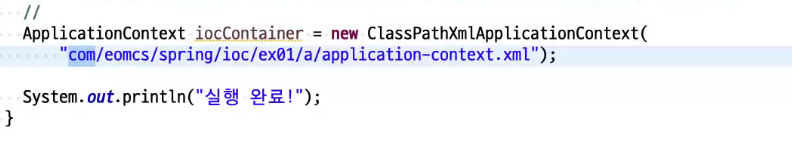
ApplicationContext iocContainer = new ClassPathXmlApplicationContext(
"com/eomcs/spring/ioc/ex01/e/application-context.xml"); |
<!-- 객체 생성 -->
<bean id="c1" class="com.eomcs.spring.ioc.ex01.Car"/> </beans> |
|
ApplicationContext
|
ApplicationContext iocContainer = new AnnotationConfigApplicationContext(
AppConfig.class); |
// 클래스 선언부에 애노테이션으로 스프링 설정에 관한 정보를 지정할 수 있다.
public class AppConfig { // 객체 생성 @Bean public Car c1() { return new Car(); } |
// 패키지를 탐색하여 빈을 자동 생성하기
|
ClassPathXmlApplicationContext
// 현재 IoC 컨테이너에 들어 있는 객체를 출력해 보자.
SpringUtils.printBeanList(iocContainer); |
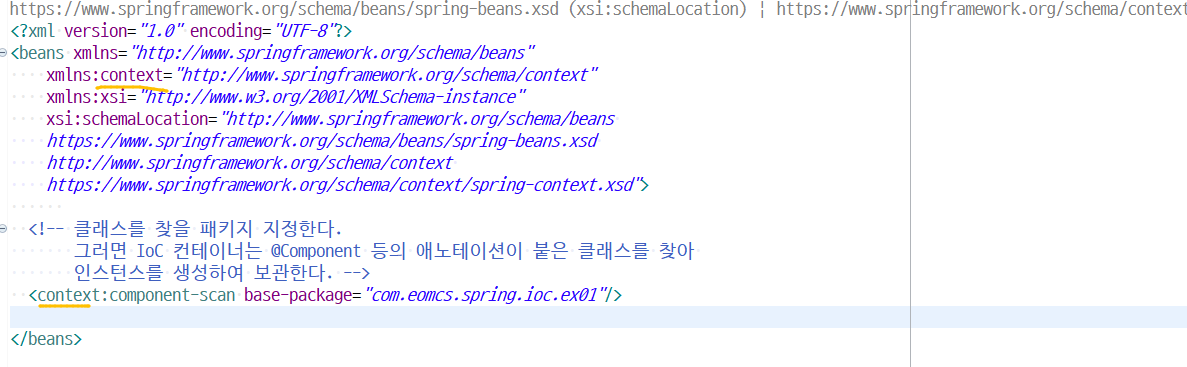
<!-- 클래스를 찾을 패키지 지정한다.
그러면 IoC 컨테이너는 @Component 등의 애노테이션이 붙은 클래스를 찾아 인스턴스를 생성하여 보관한다. --> <context:component-scan base-package="com.eomcs.spring.ioc.ex01"/> |
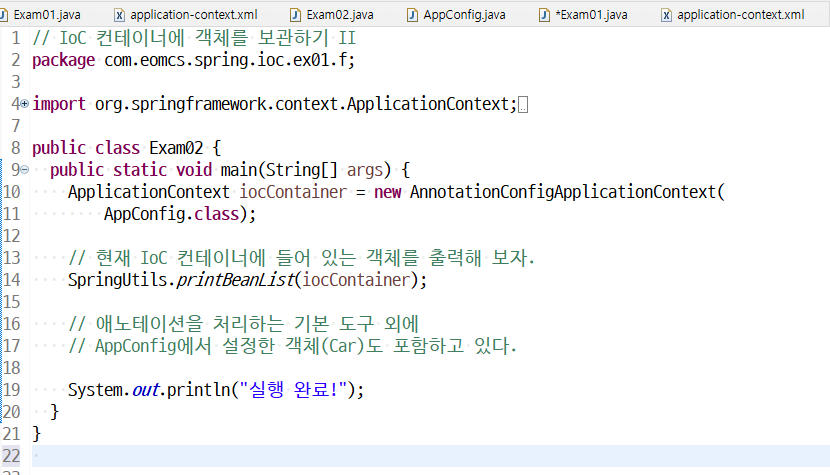
ApplicationContext
// 현재 IoC 컨테이너에 들어 있는 객체를 출력해 보자.
SpringUtils.printBeanList(iocContainer); // 애노테이션을 처리하는 기본 도구 외에 // AppConfig에서 설정한 객체(Car)도 포함하고 있다. |
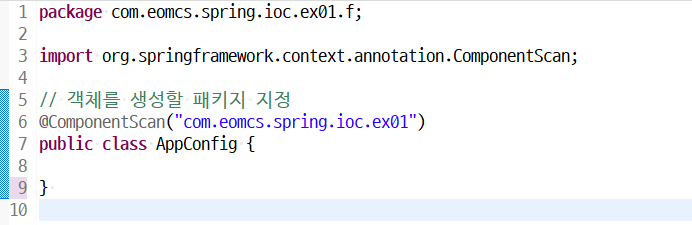
// 객체를 생성할 패키지 지정
@ComponentScan("com.eomcs.spring.ioc.ex01") public class AppConfig { } |
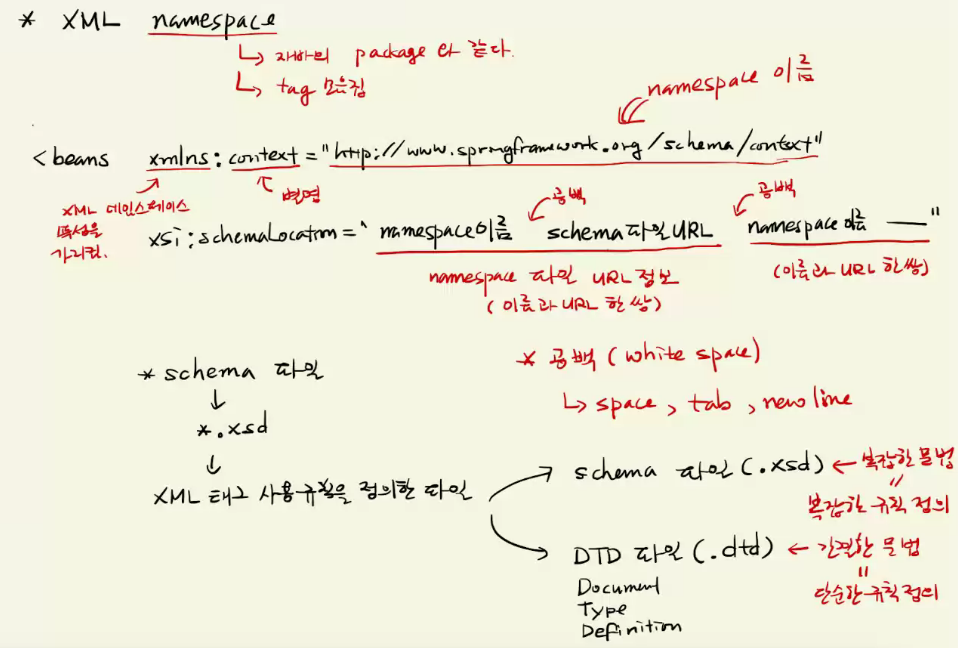
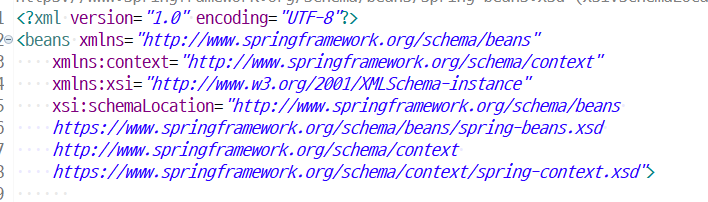
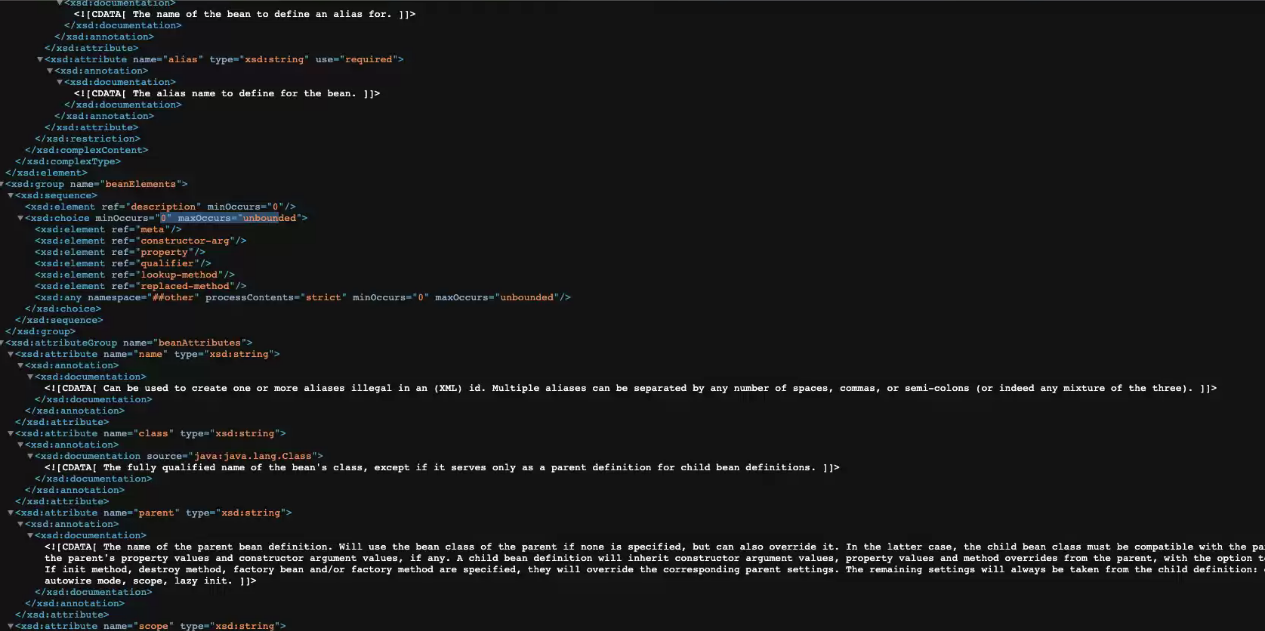
*XML nameSpace
=> 자바의 package와 같다. , tag 모음집 (태그 이름의 규칙도 몇개 있음)
[schema 파일]
<beans xmlns:context="http://www.springframework.org/schema/context"
	xsi:schemaLocation="namespace이름 namespace파일URL namespace 이름--"
     //                     	 //namepspace파일 URL정보       //이름과 URL 한 쌍
                        	// 이름과 URL 한 쌍

                                => 이름과 파일url은 공백으로 구분
*공백: white space
=> space, tab, new line
*schema 파일
=> *.xsd XML 태그 사용 규칙을 정의한 파일
1. schema 파일(.xsd) : 복잡한 문법 (복잡한 규칙 정의) 정교함.
 |
 |
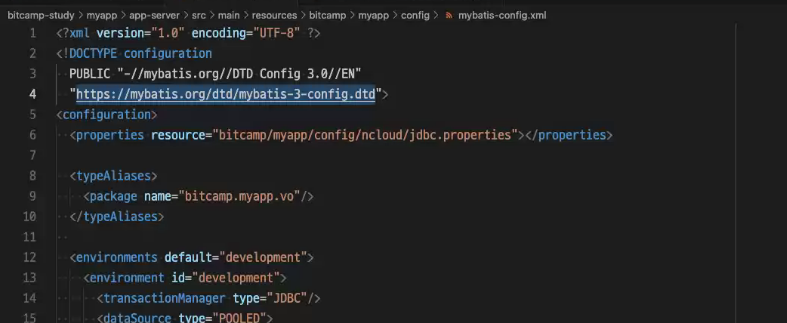
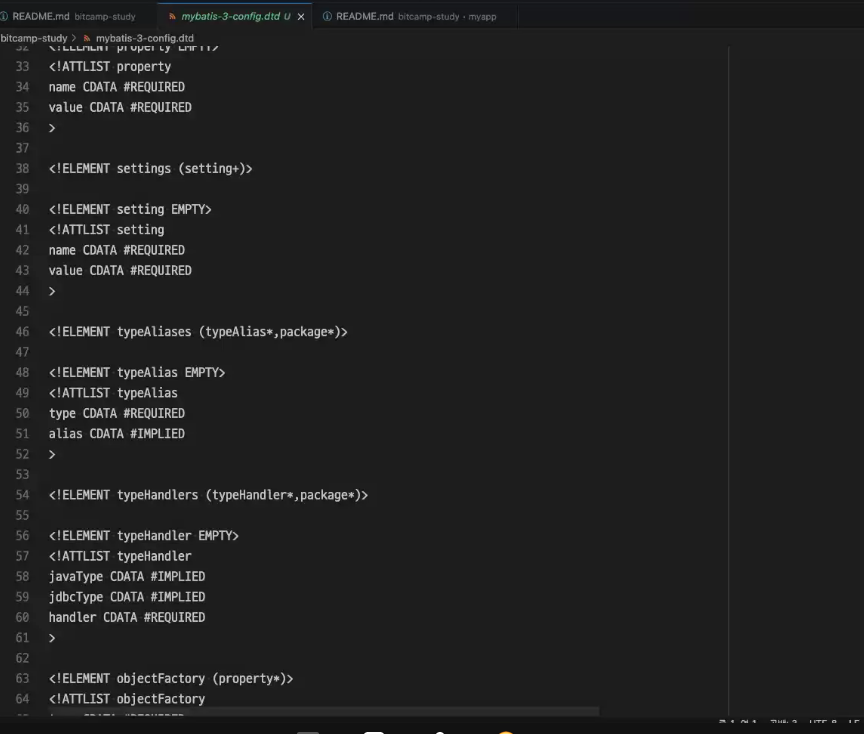
2. DTD 파일(.dtd) Document Type Definition(정의) : 간결한 문법 (단순한 규칙 정의)
xml 태그 사용 규칙을 정의한 dtd
| dtd 파일 규칙 선언 | dtd 파일 규칙 세부 |
 |
 |
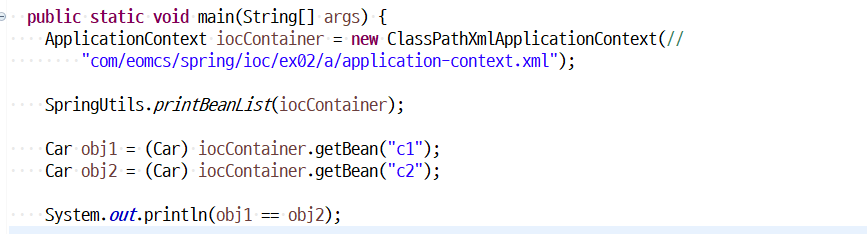
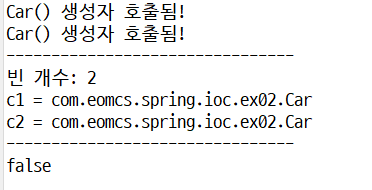
결과 값은 1이랑 같음
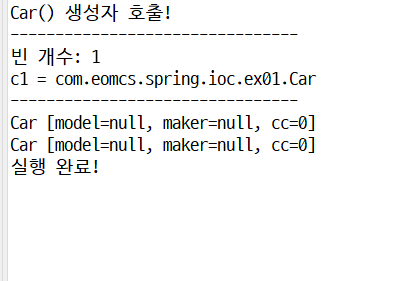
// IoC 컨테이너에서 객체 꺼내기
|
ApplicationContext iocContainer = new ClassPathXmlApplicationContext(//
"com/eomcs/spring/ioc/ex01/g/application-context.xml"); // 현재 IoC 컨테이너에 들어 있는 객체를 출력해 보자. SpringUtils.printBeanList(iocContainer); // 1) 객체 이름으로 꺼내기 System.out.println(iocContainer.getBean("c1")); // 2) 객체 타입으로 꺼내기 System.out.println(iocContainer.getBean(Car.class)); |
 |
|
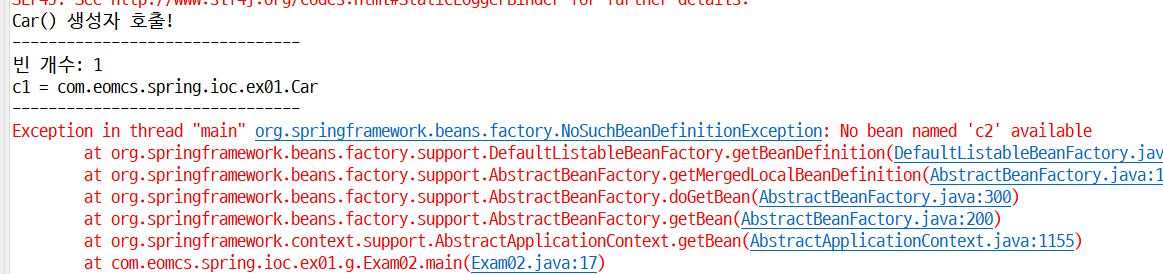
ApplicationContext iocContainer = new ClassPathXmlApplicationContext(//
"com/eomcs/spring/ioc/ex01/g/application-context.xml"); // 현재 IoC 컨테이너에 들어 있는 객체를 출력해 보자. SpringUtils.printBeanList(iocContainer); // 존재하지 않는 객체 꺼내기 System.out.println(iocContainer.getBean("c2")); // 해당 이름의 객체가 들어 있지 않다면, // => null을 리턴하는 것이 아니라 예외가 발생한다. |
 |
// 객체 생성 - <bean> 태그 사용법
 |
 |
<!-- 빈의 이름을 지정하는 다양한 방법 -->
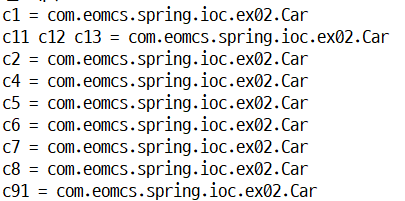
    <!-- id: 빈의 이름 -->
    <bean id="c1" class="com.eomcs.spring.ioc.ex02.Car"/>

    <!-- id 전체가 하나의 문자열로 취급된다.
       즉 "c11 c12 c13" 문자열이 객체 아이디로 사용된다.-->
    <bean id="c11 c12 c13" class="com.eomcs.spring.ioc.ex02.Car"/>

    <!-- name: 빈의 별명 -->
    <bean id="c2" name="c3" class="com.eomcs.spring.ioc.ex02.Car"/>

    <!-- id를 지정하지 않고 name만 지정하면 name이 id로 사용된다. -->
    <bean name="c4" class="com.eomcs.spring.ioc.ex02.Car"/>

    <!-- name 속성에 여러 개의 별명을 지정할 수 있다. -->
    <bean id="c5" name="c51 c52 c53" class="com.eomcs.spring.ioc.ex02.Car"/>
    <bean id="c6" name="c61,c62,c63" class="com.eomcs.spring.ioc.ex02.Car"/>
    <bean id="c7" name="c71;c72;c73" class="com.eomcs.spring.ioc.ex02.Car"/>

    <!-- name 속성에 여러 개의 별명을 입력할 때 공백, 콤마(,), 세미콜론(;)을
         사용할 수 있다. 그 외에는 불가하다! -->
    <bean id="c8" name="c81:c82:c83" class="com.eomcs.spring.ioc.ex02.Car"/>

    <!-- id 없이 name에 여러 개의 별명을 지정할 때는 그 중에서 첫 번째 별명이
         id로 사용된다. -->
<bean name="c91 c92 c93" class="com.eomcs.spring.ioc.ex02.Car"/>| // 빈의 id와 클래스명을 출력하기 SpringUtils.printBeanList(iocContainer); String[] aliases = iocContainer.getAliases("c5"); System.out.println("[별명]"); for (String alias : aliases) { System.out.println(alias); |
|
name 만 설정한 경우,
첫 번째 별명이 id로 사용된다. 두 번째 별명을 지정하지 않는다면 별명이 없는 것이다. |
|
name 만 설정한 경우,
첫 번째 별명이 id로 사용된다. 나머지 별명이 별명으로 사용된다. |
|
콜론(:)은 구분자로 사용하지 않는다.
그냥 일반 문자로 취급한다. |
|
// 빈의 id와 클래스명을 출력하기
SpringUtils.printBeanList(iocContainer); System.out.println("-------------------------"); System.out.println(iocContainer.getBean("c5")); // ID System.out.println(iocContainer.getBean("c51")); // 별명 |
 |
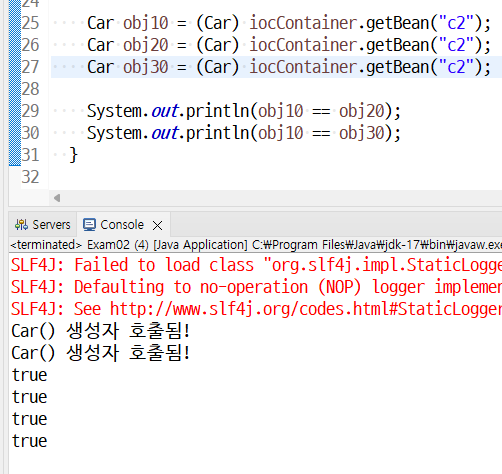
// 객체 생성 - 빈 생성 정책
    <!-- 빈 생성 정책
         scope 속성에 빈의 생성 정책을 지정할 수 있다.
         => singleton: 한 개의 객체만 생성. 지정하지 않으면 기본이 singleton이다.
         => prototype: getBean() 호출할 때마다 생성
         => request: (웹) 요청이 들어올 때마다 생성
         => session: (웹) 세션이 생성될 때마다 생성
         => application: (웹) 애플리케이션을 시작할 때 생성
         => websocket: (웹) 웹소켓이 연결될 때 생성
    -->

    <!-- scope 속성의 기본 값은 singleton -->
    <!-- singleton 객체는 IoC 컨테이너가 생성될 때 미리 준비된다. -->
    <bean id="c1" class="com.eomcs.spring.ioc.ex02.Car" />
    <bean id="c2" class="com.eomcs.spring.ioc.ex02.Car" scope="singleton"/>

    <!-- prototype 객체는 getBean()을 호출할 때마다 생성된다. -->
<bean id="c3" class="com.eomcs.spring.ioc.ex02.Car" scope="prototype"/>|
singleton으로 설정된 객체는
오직 한 개만 생성된다. getBean()을 여러 번 호출하더라도 같은 객체를 리턴한다. |
 |
|
prototype 객체
=> getBean()을 호출할 때 마다 새 객체를 만들어 리턴한다. => 특별한 경우가 아니면 이 방식을 사용하지 않는다. => 왜? 객체가 계속 생성되기 때문에 가비지가 많이 발생할 수 있다. => 그래서 IoC 컨테이너는 기본으로 singleton 방식을 사용한다. |
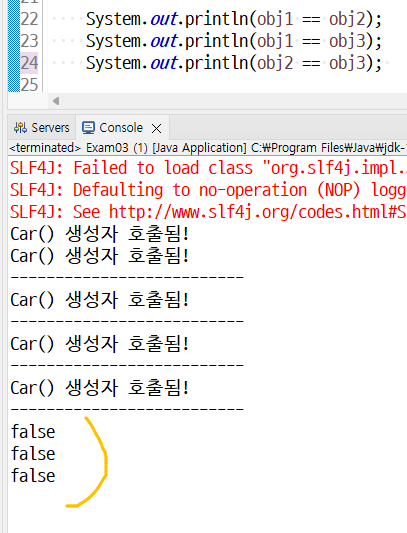 |
다른 객체에 주입되는 의존 객체로 쓸 경우 이름이 필요없당,
<!-- 빈의 이름을 지정하지 않을 경우
=> FQName과 인덱스 번호가 객체의 이름으로 사용된다.
=> FQName#인덱스번호
=> 예) com.eomcs.spring.ioc.ex02.Car#0
=> 익명 객체의 수만큼 인덱스 번호가 증가한다.
-->
<!--
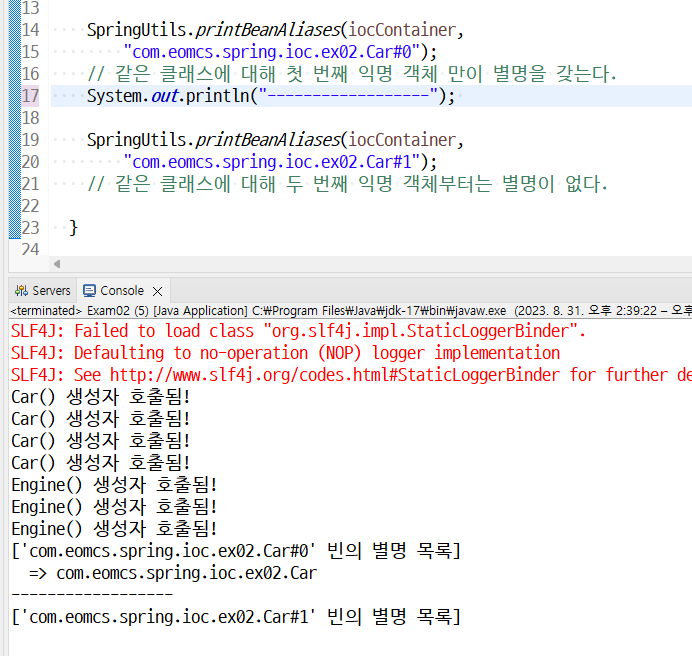
특히 0번 익명 객체의 별명은 클래스명과 같다.
즉 com.eomcs.spring.ioc.ex02.Car#0 이름을 가진 익명 객체의 별명은
com.eomcs.spring.ioc.ex02.Car 이다.
그외 익명 객체는 별명이 붙지 않는다. -->
<bean class="com.eomcs.spring.ioc.ex02.Car"/>
<bean class="com.eomcs.spring.ioc.ex02.Car"/>
<bean class="com.eomcs.spring.ioc.ex02.Car"/>
<bean class="com.eomcs.spring.ioc.ex02.Car"/>
<!-- 인덱스 번호는 클래스마다 0부터 시작한다. -->
<bean class="com.eomcs.spring.ioc.ex02.Engine"/>
<bean class="com.eomcs.spring.ioc.ex02.Engine"/>
<bean class="com.eomcs.spring.ioc.ex02.Engine"/>
</beans>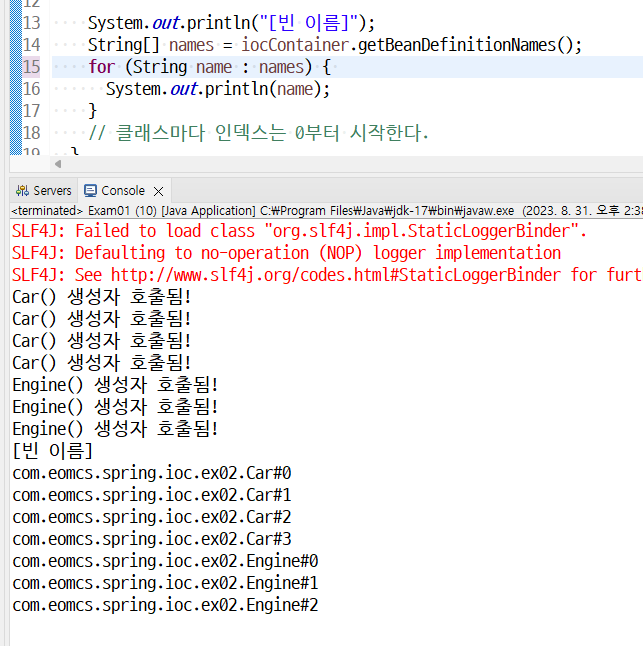 |
 |
// 생성자 호출 확인
<?xml version="1.0" encoding="UTF-8"?>
<beans xmlns="http://www.springframework.org/schema/beans"
    xmlns:xsi="http://www.w3.org/2001/XMLSchema-instance"
    xsi:schemaLocation="http://www.springframework.org/schema/beans
        http://www.springframework.org/schema/beans/spring-beans.xsd">

    <!-- 호출할 생성자 지정하기 -->

    <!-- 생성자의 파라미터 값을 주지 않으면 기본 생성자가 호출된다.  -->
    <bean id="c1" class="com.eomcs.spring.ioc.ex03.Car"/>

    <!-- 다른 생성자 호출하기 :
      => 파라미터 값을 설정하면 그 값에 맞는 생성자가 선택되어 호출된다.
      => <constructor-arg/> 엘리먼트를 사용하여 호출될 생성자를 지정할 수 있다.
      => 즉 생성자를 호출할 때 넘겨줄 값을 지정하면
         스프링 IoC 컨테이너는 그 값을 받을 생성자를 찾아 호출한다.
      => 파라미터의 개수가 같은 생성자가 여러 개 있을 경우
         스프링 IoC 컨테이너는 내부의 정책에 따라 적절한 생성자를 선택한다.
         보통 String 타입이 우선이다.-->
    <bean id="c2" class="com.eomcs.spring.ioc.ex03.Car">
        <constructor-arg>
            <value>티코</value>
        </constructor-arg>
    </bean>

    <!-- 한 개의 파라미터 값을 받는 생성자가 여러 개 있을 경우,
         String 타입의 값을 받는 생성자가 우선하여 선택된다.
         생성자를 정의한 순서는 상관없다.-->
    <bean id="c3" class="com.eomcs.spring.ioc.ex03.Car">
        <constructor-arg>
            <value>1980</value>
        </constructor-arg>
    </bean>

    <!-- 한 개의 파라미터를 가지는 생성자가 여러 개 있을 경우,
         특정 생성자를 지정하고 싶다면 파라미터의 타입을 지정하라! -->
    <bean id="c4" class="com.eomcs.spring.ioc.ex03.Car">
        <constructor-arg>
            <value type="int">1980</value>
        </constructor-arg>
    </bean>

    <!-- 파라미터가 여러 개인 생성자를 호출할 경우
         IoC 컨테이너가 가장 적합한 생성자를 찾아 호출한다. -->
    <bean id="c5" class="com.eomcs.spring.ioc.ex03.Car">
        <constructor-arg>
            <value type="java.lang.String">소나타</value>
        </constructor-arg>
        <constructor-arg>
            <value type="int">1980</value>
        </constructor-arg>
    </bean>
    <bean id="c6" class="com.eomcs.spring.ioc.ex03.Car">
        <constructor-arg>
            <value type="int">1980</value>
        </constructor-arg>
        <constructor-arg>
            <value type="java.lang.String">소나타</value>
        </constructor-arg>
    </bean>

    <!-- 파라미터의 값을 설정할 때 이름을 지정해도
         개발자가 임의로 특정 생성자를 호출하게 제어할 수 없다.
         IoC 컨테이너가 판단하여 적절한 생성자를 호출한다. -->
    <bean id="c7" class="com.eomcs.spring.ioc.ex03.Car">
        <constructor-arg name="cc">
            <value type="int">1980</value>
        </constructor-arg>
        <constructor-arg name="model">
            <value type="java.lang.String">소나타</value>
        </constructor-arg>
    </bean>
    <bean id="c8" class="com.eomcs.spring.ioc.ex03.Car">
        <constructor-arg name="model">
            <value type="java.lang.String">소나타</value>
        </constructor-arg>
        <constructor-arg name="cc">
            <value type="int">1980</value>
        </constructor-arg>
    </bean>

    <!-- index 속성을 사용하여 파라미터 값이 들어가는 순서를 지정할 수 있다.
         즉 개발자가 어떤 생성자를 호출할 지 지정할 수 있다. -->
    <bean id="c9" class="com.eomcs.spring.ioc.ex03.Car">
        <constructor-arg index="0">
            <value type="java.lang.String">소나타</value>
        </constructor-arg>
        <constructor-arg index="1">
            <value type="int">1980</value>
        </constructor-arg>
    </bean>
    <bean id="c10" class="com.eomcs.spring.ioc.ex03.Car">
        <constructor-arg index="1">
            <value type="java.lang.String">소나타</value>
        </constructor-arg>
        <constructor-arg index="0">
            <value type="int">1980</value>
        </constructor-arg>
    </bean>

    <!-- 기본 생성자가 없으면 예외 발생! -->
    <!--
    <bean id="e1" class="com.eomcs.spring.ioc.ex03.Engine"/>
    -->
</beans>
<!-- 호출할 생성자 지정하기 II -->
    <!-- 호출할 생성자 지정하기 II -->

    <!-- 생성자의 파라미터 값을 지정하는 간단한 방법 -->
    <bean id="c1" class="com.eomcs.spring.ioc.ex03.Car">
        <constructor-arg type="java.lang.String" value="티코"/>
    </bean>

    <!-- index로 파라미터의 순서를 지정하기 -->
    <bean id="c2" class="com.eomcs.spring.ioc.ex03.Car">
        <constructor-arg index="0" type="java.lang.String" value="티코"/>
        <constructor-arg index="1" type="int" value="890"/>
    </bean>

    <!-- value 속성에 지정한 값은 문자열이다.
         생성자를 호출하여 값을 넣을 때
         IoC 컨테이너는 이 문자열을 파라미터 타입으로 형변환하여 넣는다.
         단 primitive type에 대해서만 형변환할 수 있다.
         다른 타입은 불가하다 -->
    <bean id="c3" class="com.eomcs.spring.ioc.ex03.Car">
        <constructor-arg index="0" value="티코"/>
        <constructor-arg index="1" value="890"/>
<!-- 호출할 생성자 지정하기 III -->
    <!-- 생성자의 파라미터 값을 지정할 때 constructor-arg 태그가 아닌
         bean 태그의 속성 값으로 지정할 수 있다.
         단, beans 태그의 선언부에 다음 설정을 추가해야 한다.
         xmlns:c="http://www.springframework.org/schema/c"      // 생성자에 관련된 건 스키마주소 안 줘도 됨

         방법:
         c:파라미터명="값"
         이 방식으로는 타입을 지정할 수 없다.
         그냥 IoC 컨테이너에게 적절한 생성자를 호출하도록 맡겨야 한다.
    -->
    <bean id="c1" class="com.eomcs.spring.ioc.ex03.Car" c:model="티코"/>
    <bean id="c2" class="com.eomcs.spring.ioc.ex03.Car" c:cc="1980"/>
    <bean id="c3" class="com.eomcs.spring.ioc.ex03.Car" c:model="티코" c:cc="890"/>

    <!-- 물론 순서를 지정할 수 있다.
         => 방법:
           c:_인덱스번호="값"
         => 인덱스는 0부터 시작한다.
    -->
    <bean id="c4" class="com.eomcs.spring.ioc.ex03.Car" c:_1="티코" c:_0="890"/>


</beans>
<!-- 프로퍼티 설정하기 = 셋터 호출하기 -->
xmlns:p="http://www.springframework.org/schema/p"
<?xml version="1.0" encoding="UTF-8"?>
<beans xmlns="http://www.springframework.org/schema/beans"
    xmlns:p="http://www.springframework.org/schema/p"
    xmlns:xsi="http://www.w3.org/2001/XMLSchema-instance"
    xsi:schemaLocation="http://www.springframework.org/schema/beans
        http://www.springframework.org/schema/beans/spring-beans.xsd">

    <!-- 프로퍼티 설정하기 = 셋터 호출하기 -->

    <bean id="c1" class="com.eomcs.spring.ioc.ex04.Car">
        <property name="model"><value type="java.lang.String">티코1</value></property>
        <property name="maker"><value type="java.lang.String">비트자동차</value></property>
        <property name="cc"><value type="int">890</value></property>
    </bean>
    <!-- 위의 설정의 자바 코드로 표현:
        Car c1 = new Car();
        c1.setModel("티코");
        c1.setMaker("비트자동차");
        c1.setCc(Integer.parseInt("890")); <== 문자열을 primitive type으로 자동 변환한다.

        objPool.put("c1", c1);
    -->

    <!-- 프로퍼티의 타입을 생략하면 IoC 컨테이너가
         String을 프로퍼티의 타입에 맞춰서 자동 형변환한다.
    -->
    <bean id="c2" class="com.eomcs.spring.ioc.ex04.Car">
        <property name="model"><value>티코2</value></property>
        <property name="maker"><value>비트자동차</value></property>
        <property name="cc"><value>890</value></property>
    </bean>

    <!-- value 태그 대신에 property 태그의 value 속성으로 값을 지정할 수 있다. -->
    <bean id="c3" class="com.eomcs.spring.ioc.ex04.Car">
        <property name="model" value="티코3"/>
        <property name="maker" value="비트자동차"/>
        <property name="cc" value="890"/>
    </bean>

    <!-- property 태그 대신에 bean의 속성으로 프로퍼티 값을 설정할 수 있다.
         단 beans 태그에 다음 선언을 추가해야 한다.
         => xmlns:별명="http://www.springframework.org/schema/p"
         예)
         xmlns:p="http://www.springframework.org/schema/p"
         xmlns:okok="http://www.springframework.org/schema/p"
         xmlns:nono="http://www.springframework.org/schema/p"

         설정하는 방법:
         p:프로퍼티명="값"
          -->
    <bean id="c4" class="com.eomcs.spring.ioc.ex04.Car"
          p:model="티코4" p:maker="비트자동차" p:cc="890"/>

</beans>
Car.java
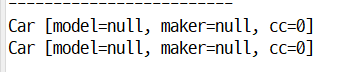
package com.eomcs.spring.ioc.ex04;

public class Car {
  String model;
  String maker;
  int cc;
  Engine engine;

  public Car() {
    System.out.println("Car() 생성자 호출됨!");
  }

  @Override
  public String toString() {
    return "Car [model=" + model + ", maker=" + maker + ", cc=" + cc + ", engine=" + engine + "]";
  }

  public Engine getEngine() {
    return engine;
  }

  public void setEngine(Engine engine) {
    System.out.println("setEngine() 호출됨!");
    this.engine = engine;
  }

  public String getModel() {
    return model;
  }

  public void setModel(String model) {
    System.out.println("setModel() 호출됨!");
    this.model = model;
  }

  public String getMaker() {
    return maker;
  }

  public void setMaker(String maker) {
    System.out.println("setMaker() 호출됨!");
    this.maker = maker;
  }

  public int getCc() {
    return cc;
  }

  public void setCc(int cc) {
    System.out.println("setCc() 호출됨!");
    this.cc = cc;
  }


}|
프로퍼티의 타입이 int 일 경우 XML에 작성한 문자열이
자동으로 int 값으로 형변환된다. 만약 형변환할 수 없다면 예외가 발생한다. 자동 형변환은 primitive type에 대해서만 가능하다. 그 외의 타입에 대해서는 문자열을 자동 형변환하지 않는다. 형변환하고 싶으면 개발자가 형변환시키는 클래스를 만들어 스프링 프레임워크에 등록해야 한다. |
<!-- 의존 객체 주입하기 -->
<?xml version="1.0" encoding="UTF-8"?>
<beans xmlns="http://www.springframework.org/schema/beans"
    xmlns:p="http://www.springframework.org/schema/p"
    xmlns:xsi="http://www.w3.org/2001/XMLSchema-instance"
    xsi:schemaLocation="http://www.springframework.org/schema/beans
        http://www.springframework.org/schema/beans/spring-beans.xsd">

    <!-- 의존 객체 주입하기 -->

    <bean id="e1" class="com.eomcs.spring.ioc.ex04.Engine">
        <property name="maker" value="비트자동차"/>
        <property name="valve" value="16"/>
        <property name="cylinder" value="8"/>
    </bean>
    <!--
      Engine e1 = new Engine();
      e1.setMaker("비트자동차");
      e1.setValve(Integer.parseInt("16"));
      e1.setCylinder(Integer.parseInt("8"));
     -->

    <bean id="e2" class="com.eomcs.spring.ioc.ex04.Engine">
        <property name="maker" value="캠프자동차"/>
        <property name="valve" value="8"/>
        <property name="cylinder" value="4"/>
    </bean>
    <!--
      Engine e2 = new Engine();
      e1.setMaker("캠프자동차");
      e1.setValve(Integer.parseInt("8"));
      e1.setCylinder(Integer.parseInt("4"));
     -->

    <bean id="c1" class="com.eomcs.spring.ioc.ex04.Car">
        <property name="model" value="티코A"/>
        <property name="maker" value="비트자동차"/>
        <property name="cc" value="890"/>
        <!-- 의존 객체 설정하기
             ref="객체이름"
        -->
        <property name="engine" ref="e1"/>
    </bean>
    <!--
      Car c1 = new Car();
      c1.setModel("티코A");
      c1.setMaker("비트자동차");
      c1.setCc(Integer.parseInt("890"));
      c1.setEngine(e1);
     -->

    <!-- p 속성으로 프로퍼티에 객체를 주입할 때는
         p:프로퍼티명-ref="객체이름" -->
    <bean id="c2" class="com.eomcs.spring.ioc.ex04.Car"
          p:model="티코"
          p:maker="비트자동차"
          p:cc="890"
          p:engine-ref="e2"/>

</beans>|
프로퍼티 값을 주입할 때:
1) 의존 객체가 생성되지 않은 상태라면, 먼저 의존 객체를 생성한 후 프로퍼티 값을 주입한다. // 그러니 코드짤때 순서 신경안써두 됨 2) 의존 객체가 생성된 상태라면, 그대로 프로퍼티 값을 주입한다. |
// 프로퍼티 호출 - 의존 객체 주입할 때 즉시 객체 생성하기
=> 이렇게 만든 건 다른 객체랑 공유 불가
<?xml version="1.0" encoding="UTF-8"?>
<beans xmlns="http://www.springframework.org/schema/beans"
    xmlns:p="http://www.springframework.org/schema/p"
    xmlns:xsi="http://www.w3.org/2001/XMLSchema-instance"
    xsi:schemaLocation="http://www.springframework.org/schema/beans
        http://www.springframework.org/schema/beans/spring-beans.xsd">

    <!-- 의존 객체 주입할 때 직접 객체를 만들어 주입할 수 있다.-->

    <bean id="c1" class="com.eomcs.spring.ioc.ex04.Car">
        <property name="model" value="티코A"/>
        <property name="maker" value="비트자동차"/>
        <property name="cc" value="890"/>
        <property name="engine">
          <bean class="com.eomcs.spring.ioc.ex04.Engine">
            <property name="maker" value="비트자동차"/>
            <property name="valve" value="16"/>
            <property name="cylinder" value="8"/>
          </bean>
        </property>
    </bean>
    <!--
      Car c1 = new Car();
      c1.setModel("티코A");
      c1.setMaker("비트자동차");
      c1.setCc(Integer.parseInt("890"));
      Engine temp = new Engine();
      temp.setMaker("비트자동차");
      temp.setValve(Integer.parseInt("16"));
      temp.setCylinder(Integer.parseInt("8"));
      c1.setEngine(temp);
     -->

    <bean id="c2" class="com.eomcs.spring.ioc.ex04.Car">
        <property name="model" value="소나타"/>
        <property name="maker" value="비트자동차"/>
        <property name="cc" value="1980"/>
        <property name="engine">
            <bean class="com.eomcs.spring.ioc.ex04.Engine">
                <property name="maker" value="비트자동차"/>
                <property name="valve" value="16"/>
                <property name="cylinder" value="8"/>
            </bean>
        </property>
    </bean>

</beans>
<!-- 컬렉션 타입의 프로퍼티 값 설정하기 -->
    <bean id="c1" class="com.eomcs.spring.ioc.ex05.a.Car">
        <!-- 배열 프로퍼티 값 설정하기 -->
        <property name="tires">
            <array>
                <bean class="com.eomcs.spring.ioc.ex05.a.Tire"
                      p:maker="금호타이어" p:width="180"/>
                <bean class="com.eomcs.spring.ioc.ex05.a.Tire"
                      p:maker="금호타이어" p:width="180"/>
                <bean class="com.eomcs.spring.ioc.ex05.a.Tire"
                      p:maker="한국타이어" p:width="180"/>
                <bean class="com.eomcs.spring.ioc.ex05.a.Tire"
                      p:maker="한국타이어" p:width="180"/>
                <bean class="com.eomcs.spring.ioc.ex05.a.Tire"
                      p:maker="비트타이어" p:width="100"/>
            </array>
        </property>
    </bean>

    <bean id="c2" class="com.eomcs.spring.ioc.ex05.a.Car">
        <!-- 배열 프로퍼티 값 설정하기 -->
        <property name="tires">
            <list> <!-- array 태그 대신에 list 태그를 사용해도 된다. -->
                <bean class="com.eomcs.spring.ioc.ex05.a.Tire"
                      p:maker="금호타이어" p:width="180"/>
                <bean class="com.eomcs.spring.ioc.ex05.a.Tire"
                      p:maker="금호타이어" p:width="180"/>
                <bean class="com.eomcs.spring.ioc.ex05.a.Tire"
                      p:maker="한국타이어" p:width="180"/>
                <bean class="com.eomcs.spring.ioc.ex05.a.Tire"
                      p:maker="한국타이어" p:width="180"/>
                <bean class="com.eomcs.spring.ioc.ex05.a.Tire">
                  <property name="maker" value="비트타이어"/>
                  <property name="width" value="100"/>
                </bean>
            </list>
        </property>
    </bean>

</beans>
<!-- Map 프로퍼티 값 설정하기 : 배열과 똑같다. -->
    <!-- 컬렉션 타입의 프로퍼티 값 설정하기 -->

    <bean id="c1" class="com.eomcs.spring.ioc.ex05.c.Car">
        <!-- Map 프로퍼티 값 설정하기 : 배열과 똑같다.  -->
        <property name="options">
            <map>
                <entry>
                    <key><value>sunroof</value></key>
                    <value>true</value>
                </entry>
                <entry key="auto" value="true"/>
                <entry key="spareTire">
                    <!-- 객체를 바로 만들어 넣고 싶다면 bean 태그를 사용하라! -->
                    <bean class="com.eomcs.spring.ioc.ex05.c.Tire" p:maker="비트타이"/>
                </entry>
                <entry key="engine" value-ref="e1"/>
            </map>
        </property>
    </bean>

    <bean id="e1" class="com.eomcs.spring.ioc.ex05.c.Engine" p:maker="비트자동차"/>
</beans>
// 컬렉션 타입의 프로퍼티 값 설정 - Properties
    <!-- 컬렉션 타입의 프로퍼티 값 설정하기 -->

    <bean id="c1" class="com.eomcs.spring.ioc.ex05.d.Car">
        <!-- Properties 프로퍼티 값 설정하기  -->
        <property name="options">
            <props>
                <prop key="sunroof">true</prop>
                <prop key="auto">true</prop>
                <prop key="color">black</prop>
                <prop key="blackbox">false</prop>
            </props>
        </property>
    </bean>
</beans>
// 팩토리 메서드 호출 - static 메서드 호출
<?xml version="1.0" encoding="UTF-8"?>
<beans xmlns="http://www.springframework.org/schema/beans"
    xmlns:p="http://www.springframework.org/schema/p"
    xmlns:xsi="http://www.w3.org/2001/XMLSchema-instance"
    xsi:schemaLocation="http://www.springframework.org/schema/beans
        http://www.springframework.org/schema/beans/spring-beans.xsd">

    <!-- 팩토리 메서드를 통해 객체를 만들기 -->

    <bean id="c1"
          class="com.eomcs.spring.ioc.ex06.a.CarFactory"
          factory-method="create">
        <!-- create() 메서드를 호출할 때 넘겨줄 파라미터 값 -->
        <constructor-arg value="티코"/>
    </bean>
    <!--
        속성:
            factory-method="스태틱 메서드 이름"
            class="스태틱 메서드가 들어있는 클래스 이름"
        자바 코드:
            Object obj = CarFactory.create("티코");
            objPool.put("c1", obj);
        => 'c1' 이라는 이름으로 저장되는 것은 CarFactory 객체가 아니라
           create()가 리턴한 Car 객체이다.
     -->

    <bean id="c2" class="com.eomcs.spring.ioc.ex06.a.CarFactory"
          factory-method="create">
        <constructor-arg value="소나타"/>
    </bean>

    <bean id="c3" class="com.eomcs.spring.ioc.ex06.a.CarFactory"
          factory-method="create">
        <constructor-arg value="오호라"/>
    </bean>

</beans>
// 팩토리 메서드 호출 - static 메서드 호출 응용
    <!-- 팩토리 메서드를 통해 객체를 만들기 - 응용 -->

    <!-- "yyyy-MM-dd" 형식의 문자열을 가지고 java.sql.Date 객체 만들기
         자바 코드:
         Date d1 = Date.valueOf("yyyy-MM-dd");
    -->
    <bean id="d1" class="java.sql.Date"
          factory-method="valueOf">
        <constructor-arg value="2021-11-16"/>
    </bean>
// 팩토리 메서드 호출 - 인스턴스 메서드 호출
    <!-- 팩토리 메서드를 통해 객체를 만들기 : 인스턴스 메서드 호출 -->
    <bean id="carFactory" class="com.eomcs.spring.ioc.ex06.c.CarFactory"/>

    <!-- 자바 코드:
            CarFactory carFactory = new CarFactory();
            Object obj = carFactory.create("SM5");
            objPool.put("c1", obj);
     -->
    <bean id="c1"
          factory-bean="carFactory"
          factory-method="create">
        <constructor-arg value="SM5"/>
    </bean>
    <!--
        속성:
            factory-bean="공장역할을 수행하는 객체이름"
            factory-method="인스턴스 메서드 이름"
            => factory-bean 속성을 설정하면 factory-method는
               스태틱 메서드가 아니라 인스턴스 메서드를 가리키게 된다.
     -->

</beans>
package com.eomcs.spring.ioc.ex06.c;
import com.eomcs.spring.ioc.ex06.Car;
public class CarFactory {
// 팩토리 메서드가 인스턴스 메서드이다.
// => 팩토리 메서드가 non-static 메서드이다.
public Car create(String model) {
Car c = new Car();
switch (model) {
case "티코":
c.setMaker("대우자동차");
c.setModel("Tico");
c.setCc(890);
return c;
case "소나타":
c.setMaker("현대자동차");
c.setModel("Sonata");
c.setCc(1980);
return c;
case "SM5":
c.setMaker("르노삼성자동차");
c.setModel("SM5");
c.setCc(1990);
return c;
default: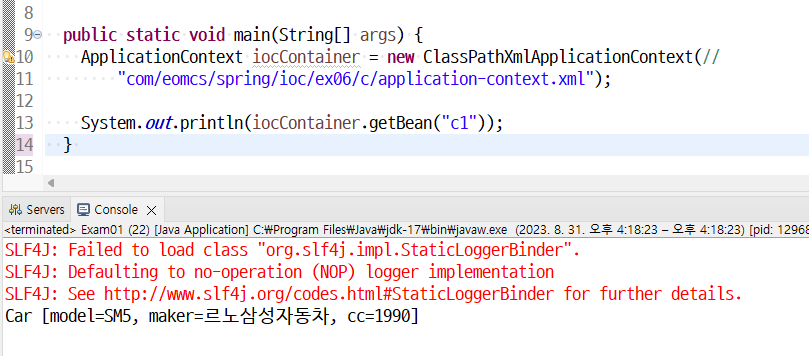
// 팩토리 메서드 호출 - FactoryBean 구현체
<!-- 팩토리 메서드를 통해 객체를 만들기 : 스프링 규칙에 따라 만들기 -->
package com.eomcs.spring.ioc.ex06.d;

import org.springframework.beans.factory.FactoryBean;
import com.eomcs.spring.ioc.ex06.Car;

// 스프링 IoC 컨테이너가 정한 규칙에 따라 공장 클래스를 만들면,
// 구현할 때 복잡한 면이 있다.
// 하지만 빈 생성을 설정할 때는 기존 방식 보다 쉽다.
//
// 스프링에서 공장 클래스를 만들 때 제안한 규칙?
// => org.springframework.beans.factory.FactoryBean 인터페이스
//
public class CarFactory implements FactoryBean<Car> {

  String model;

  public CarFactory() {
    System.out.println("CarFactory() 생성자 호출됨.");
  }

  public void setModel(String model) {
    System.out.println("CarFactory.setModel() 호출됨.");
    this.model = model;
  }

  @Override
  public Car getObject() throws Exception {
    System.out.println("CarFactory.getObject() 호출됨.");
    // 객체를 생성해서 리턴하는 팩토리 메서드이다.
    // 스프링 IoC 컨테이너는 이 메서드를 호출할 것이다.
    // 이 방식으로는 객체를 생성할 때 추가적으로 필요한 값을 파라미터로 받을 수 없기 때문에
    // 프로퍼티로 받도록 해야 한다.
    Car c = new Car();
    switch (model) {
      case "티코":
        c.setMaker("대우자동차");
        c.setModel("Tico");
        c.setCc(890);
        return c;
      case "소나타":
        c.setMaker("현대자동차");
        c.setModel("Sonata");
        c.setCc(1980);
        return c;
      case "SM5":
        c.setMaker("르노삼성자동차");
        c.setMaker("SM5");
        c.setCc(1990);
        return c;
      default:
        c.setMaker("비트자동차");
        c.setModel("자바휘웅");
        c.setCc(5000);
        return c;
    }
  }

  @Override
  public Class<?> getObjectType() {
    // getObject()가 생성해주는 객체의 타입 정보를 리턴한다.
    // 이 메서드는 Spring IoC 컨테이너가 타입으로 객체를 찾을 때 사용한다.
    System.out.println("CarFactory.getObjectType() 호출됨.");
    return Car.class;
  }
}
    <!-- 팩토리 메서드를 통해 객체를 만들기 : 스프링 규칙에 따라 만들기 -->
    <bean id="c1" class="com.eomcs.spring.ioc.ex06.d.CarFactory">
        <property name="model" value="소나타"/>
    </bean>
    <!-- 자바 코드:
            CarFactory carFactory = new CarFactory();
            carFactory.setModel("소나타");

            // FactoryBean의 구현체 여부에 따라 "c1" 이라는 이름으로 저장할 객체가 다르다.
            if (carFactory instanceof FactoryBean) {
                objPool.put("c1", carFactory.getObject());
            } else {
                objPool.put("c1", carFactory);
            }
     -->

</beans>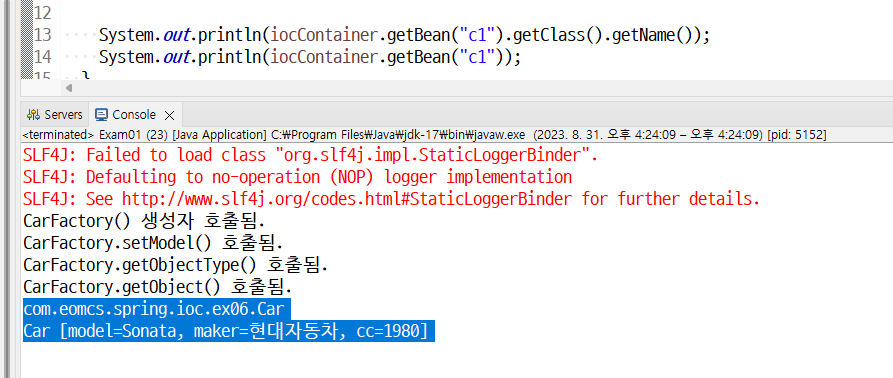
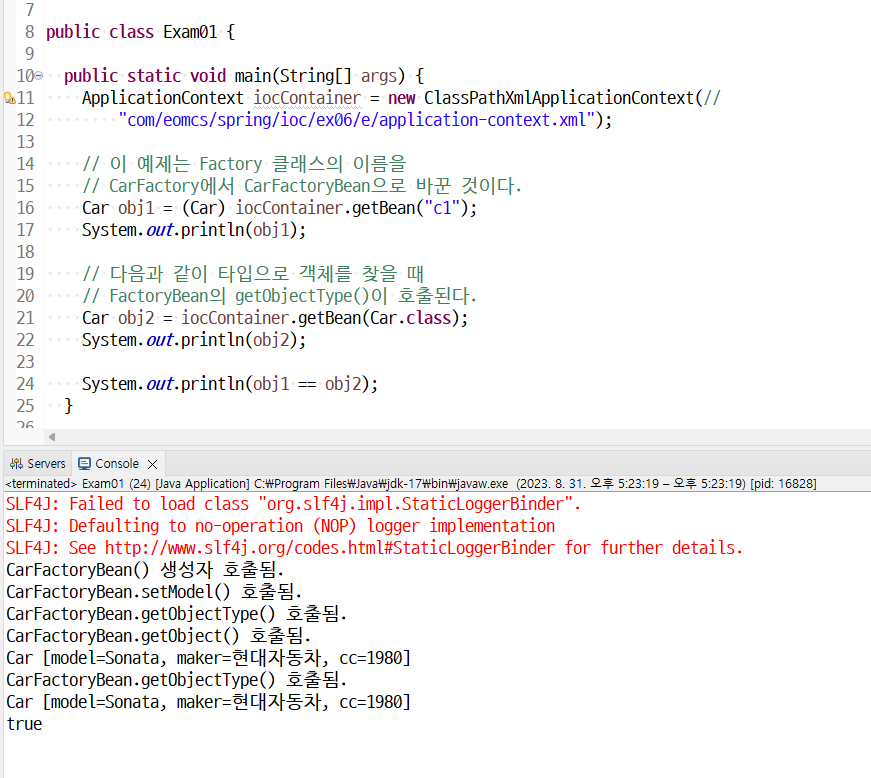
| package com.eomcs.spring.ioc.ex06.e; import org.springframework.beans.factory.FactoryBean; import com.eomcs.spring.ioc.ex06.Car; // 보통 FactoryBean 구현체를 만들 때는 // 클래스 이름 뒤에 접미사로 FactoryBean을 붙여 // 다른 개발자가 쉽게 알아보도록 만든다. // public class CarFactoryBean implements FactoryBean<Car> { String model; public CarFactoryBean() { System.out.println("CarFactoryBean() 생성자 호출됨."); } public void setModel(String model) { System.out.println("CarFactoryBean.setModel() 호출됨."); this.model = model; } @Override public Car getObject() throws Exception { System.out.println("CarFactoryBean.getObject() 호출됨."); // 객체를 생성해서 리턴하는 메서드이다. // 스프링 IoC 컨테이너는 이 메서드를 호출할 것이다. // 이 방식으로는 객체를 생성할 때 추가적으로 필요한 값을 파라미터로 받을 수 없기 때문에 // 프로퍼티로 받도록 해야 한다. Car c = new Car(); switch (model) { case "티코": c.setMaker("대우자동차"); c.setModel("Tico"); c.setCc(890); return c; case "소나타": c.setMaker("현대자동차"); c.setModel("Sonata"); c.setCc(1980); return c; case "SM5": c.setMaker("르노삼성자동차"); c.setMaker("SM5"); c.setCc(1990); return c; default: c.setMaker("비트자동차"); c.setModel("자바휘웅"); c.setCc(5000); return c; } } @Override public Class<?> getObjectType() { // getObject()가 생성해주는 객체의 타입 정보를 리턴한다. // 이 메서드는 Spring IoC 컨테이너가 타입으로 객체를 찾을 때 사용한다. System.out.println("CarFactoryBean.getObjectType() 호출됨."); return Car.class; } } |
|
<?xml version="1.0" encoding="UTF-8"?>
<beans xmlns="http://www.springframework.org/schema/beans" xmlns:p="http://www.springframework.org/schema/p" xmlns:xsi="http://www.w3.org/2001/XMLSchema-instance" xsi:schemaLocation="http://www.springframework.org/schema/beans http://www.springframework.org/schema/beans/spring-beans.xsd"> <!-- 클래스 이름이 FactoryBean으로 끝나면 그 클래스가 FactoryBean 구현체임을 쉽게 눈치챌 수 있다. --> <bean id="c1" class="com.eomcs.spring.ioc.ex06.e.CarFactoryBean"> <property name="model" value="소나타"/> </bean> <!-- 자바 코드: CarFactoryBean carFactory = new CarFactoryBean(); carFactory.setModel("소나타"); // FactoryBean의 구현체 여부에 따라 "c1" 이라는 이름으로 저장할 객체가 다르다. if (carFactory instanceof FactoryBean) { objPool.put("c1", carFactory.getObject()); } else { objPool.put("c1", carFactory); } --> </beans> |
 |
'[네이버클라우드] 클라우드 기반의 개발자 과정 7기 > 웹프로그래밍' 카테고리의 다른 글
| 9/1 프로젝트 (0) | 2023.09.01 |
|---|---|
| [NC7기-89일차(9월1일)] - 웹프로그래밍 70일차 (0) | 2023.09.01 |
| [NC7기-87일차(8월30일)] - 웹프로그래밍 68일차 (2) | 2023.08.30 |
| 8/30 프로젝트 (0) | 2023.08.30 |
| IJ 저장할때 IMPORT 항목 정리 (0) | 2023.08.30 |